Table of Contents
What’s particularly irritating about the Bing redirect virus is that it keeps the affected Mac users from searching the web with any other provider.
What is the Bing redirect Mac virus?
In today’s world of ubiquitous digitalization and high-end technologies, Internet traffic is a valuable product that costs money to obtain. Ideally, the end users maintain full control of which sites they visit and when. This paradigm drives permanent improvements of web services whose proprietors strive to offer something better than the others and thus entice people to get aboard. This is the ideal, ethical model that doesn’t always work the way it should, though. The Bing redirect Mac virus is an example of a crooked online marketing that definitely deviates from the norm. The Mac users who fall victim to this infection experience iterative Safari redirects to bing.com for seemingly no apparent reason.

It’s important to emphasize at this point that the landing page is an entirely legitimate search engine brought to millions of users by Microsoft, and blaming the twisted traffic on this provider is a misinterpretation. No wonder many victims find it strange that a piece of malware reroutes their Safari browser to the reputable, although far from the most popular search engine. There is an explanation to this oddity. Every single time the redirect happens, the Mac user’s online traffic is tunneled through several transitional domains. One of the interim URLs currently in rotation is searchbaron.com, with the sites switching from time to time. This activity is hardly visible to the naked eye, but technically, the intercepted web navigation follows a complex path and hits a number of web pages related to ad networks or similar services. In the end, it’s the trusted Bing homepage, so some infected Mac users go ahead and try to take a dive into the Safari settings to select the preferred provider. However, their efforts fail. Why? Because the configuration changes ensue from malicious activity.
The Bing redirect virus infiltrates Mac computers via a prosaic, yet effective technique. It’s about bundling, a method used to spread harmful applications alongside safe ones. These downloads are typically hosted on unofficial sources with poor reputation, where the individuals in charge rake in profits by cross-promoting various controversial programs. If the person who’s installing some nice little applet opts for the recommended (default) setup, they run the risk of additionally agreeing to install the malware without realizing it. Upon contaminating a Mac in such a furtive fashion, the infection gives Safari settings an overhaul and may also tamper with the system’s DNS settings.
As a result, whenever the victim tries to find random information via their search engine of choice, they will be ending up on bing.com in the long run. It’s due to this in-depth interference that the repair is more complicated than merely altering the browser settings by hand. Thankfully, there is a way to tackle the problem in a few minutes. Keep reading to get an idea of the Bing redirect Mac virus removal done right.
Automatic removal of Bing redirect virus from Mac
If this threat has infected your Mac, the most effective way to get rid of it is to use an automatic cleaning tool. The main benefit of taking this route is that the security application will accurately pinpoint and remove all the malicious files, including hidden components that could be difficult to find and erase manually. MacBooster is an award-winning solution that makes this process easy and fast. Follow the steps below to make the most of its malware removal and optimization power:
1. Download and install MacBooster onto your Mac.Download Bing virus removal tool
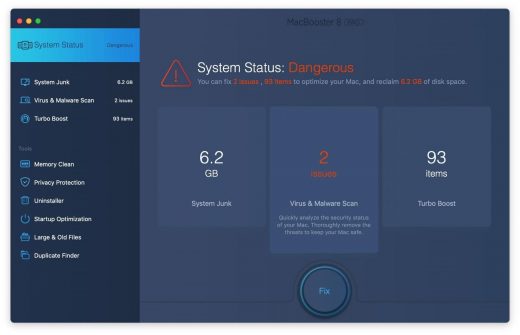
2. Open the tool and click on the Scan button on its home screen called System Status. The application will check your Mac for viruses and malware, memory issues, and junk files.

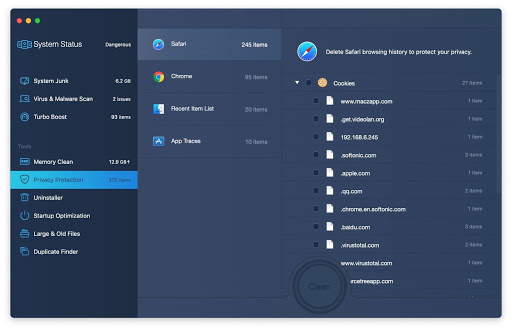
 4. To address the after-effects of Bing virus activity in the web browser, select the Privacy Protection feature in MacBooster sidebar, choose your default browser, and click on the
Clean button at the bottom. This will delete unwanted cookies and other items affecting the browser behavior.
4. To address the after-effects of Bing virus activity in the web browser, select the Privacy Protection feature in MacBooster sidebar, choose your default browser, and click on the
Clean button at the bottom. This will delete unwanted cookies and other items affecting the browser behavior.
The Bing virus shouldn’t be messing around with your Mac any longer. Be advised, though, that your default browser may still be redirected to dubious pages until you rectify its settings (the reset procedure will be described further down).
Bing redirect virus manual removal from Mac
The gist of this section is to walk you through the process of deleting all non-obfuscated files related to the Bing virus Mac. It’s best to perform the cleanup in the order specified below.
-
Click the Go icon in Finder and select Utilities on the list

-
Find and select the Activity Monitor under Utilities
-
In the Activity Monitor, scrutinize the running processes for one that consumes lots of CPU and looks suspicious. Once the likely baddie is found, select it and click the Quit Process icon. An additional
confirmation dialog will pop up – click Force Quit on it
-
Now, go to Applications under the Go menu
-
What you need to do is scroll down the list of installed apps in search of the malicious item. It could be a program with a gibberish name or one that ended up on your Mac beyond your awareness
-
Go to System Preferences as shown below
-
Select Accounts, then Login Items. You will see all the apps that run as part of the Mac startup process. Find the infection and remove it from the list by means of the “minus” icon


Now that you have suppressed the virus proper, you need to fix the problem in Safari. The browser defaults continue to be set to Bing, therefore the repair requires some manual configuration tweaking.
Reset Safari to its defaults
-
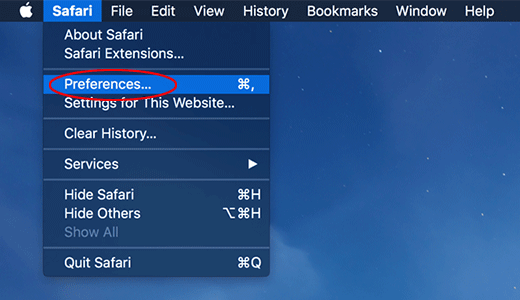
Go to Safari menu bar and select Preferences again on the drop-down list
-
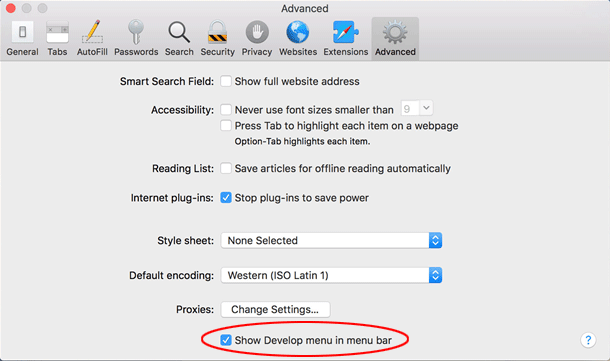
Go to Advanced tab and enable the option that says Show Develop menu in menu bar
-
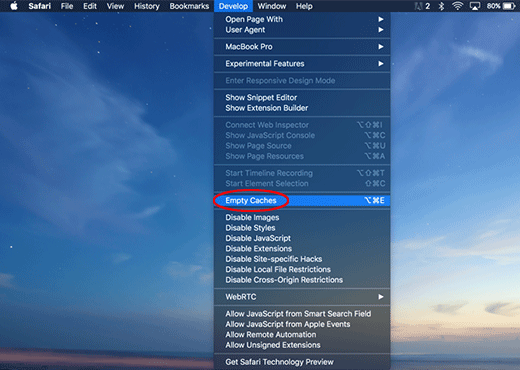
Now you will see the extra Develop menu in your Safari menu bar. Click it and select Empty Caches as shown below
-
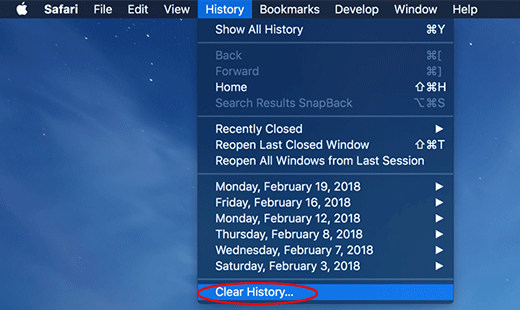
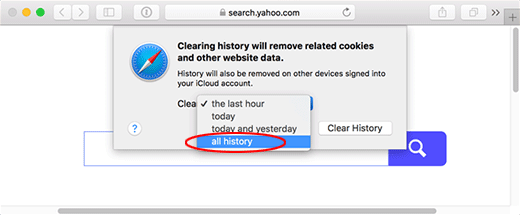
Do some test browsing to see if things are okay now and whether the malware is gone. If the issue is still there, you may need to additionally clear your browsing history in Safari. In Safari menu bar, select
History and click Clear History
-
The browser will display a dialog so that you can select the required period you would like to clear history for. Select all history on the list and click the Clear History button
-
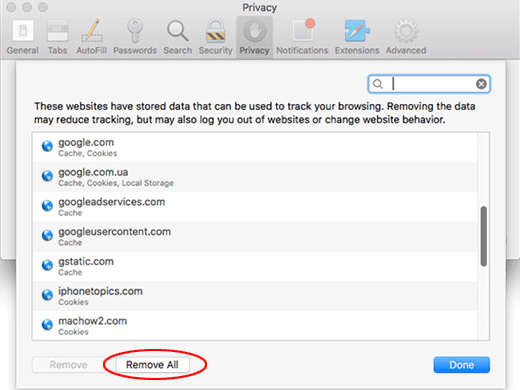
In case Safari is still acting up due to malware interference, there is one more thing you can try. Once again, go to Preferences from the Safari menu bar and select the Privacy tab
this time. Click Manage Website Data
-
When Safari generates a full list of sites that have stored your browsing data, go ahead and click Remove All
- Confirm by hitting the Done button.